Tuesday, January 27, 2009
Wednesday, December 3, 2008
map a photo onto a shape.

Mapping photos onto shapes is a standard for photo-based posters and memory collages. It is also a great method of creating illustrations.
First-
make any shape using the pen tool or anything from the shape library. In the pen or shape options make sure that you have the shape button selected. If you have been using paths it will be set to paths from last time. It doesn't matter what color the shape is.
Second-
Place a photo in a new layer above the shape. If you started with a photo, you can double click it to make it a layer, then drag it to the top of the stack in the layers palette.
Third-
Hold the OPTION KEY. Now scroll your mouse over the DIVIDING LINE between the two layers. the cursor changes to a symbol of two interlocking circles. Click the dividing line between the two layers. The photo is now linked to the shape and uses it as a vector mask.
Manipulation-
The image and mask can be manipulated separately. Use the move tool to manipulate the image. Use the path selection tool and direct selection tool to manipulate the mask. Use the pen tool to add, delete and alter points.
Signature style-
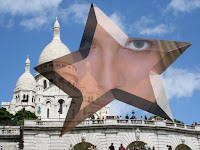
A special signature style of photoshop is the look of a transparent shape with an image map floating over another image. This is referred to as the "glass tile" look, and I'm sure you have seen it everywhere. Reduce the opacity of the shape layer and place another image behind it for the glass tile look.
Vectors and FX
Remember the FX palette? The FX palette works with vector shapes (although we've only used it for text, another kind of vector shape) Use the FX palette to apply a bevel to the final product. click on the fx button in the layer palette to apply the bevel. The final effect is really pleasing, and used everywhere for photo-illustration. Going for total commercial cheese? add a lens flare (filters-render-lens flare) to a star shape photo map for kitschy glamour.
Monday, December 1, 2008
Sunday, November 30, 2008
fix heidi klum/ then make her into an alien
use the healing brush to repair all of the wrinkles and other problems with heidi
use the red eye tool to fix heidi's red eye.
use the blur tool to smooth out the rest of her skin
create an adjustment layer (levels) and adjust rgb channels separately to change the color of her skin and hair.
download the three statue pieces.
cut them from their background by using magic wand and selection tools. copy and paste them onto heidi's face and arrange them with move/transform. make the pieces fit the face.
clean up the edges of the pieces with the eraser tool.
duplicate the layers of each piece. (drag layer image into new layer button) set each duplicate to screen.
Derive selection from each piece. make a new layer at the top for a color silhouette.
Choose paintbucket and sample heidi's skin color using option key.
Fill selection set with paint (skin color)
Switch blending mode of silhouette layer to color.
Select all three layers by holding shift. Hit apple G for group.
Make sure your move tool is set to auto select group.
Apply a mask to the group.
Use the black to transparent gradient to fade transitions between the face and the statue pieces.
repeat with all of the statue pieces.
blur/sharpen/burn/dodge/smudge
alter the picture of the Sacre Cour in the following ways:
Dodge the wall in front of the sacre cour.
Burn the church itself.
Blur the wall in front of the sacre cour to create a depth of field effect
Sharpen the church itself to emphasize its detail
Smudge the sky and clouds into new forms.
Dodge the wall in front of the sacre cour.
Burn the church itself.
Blur the wall in front of the sacre cour to create a depth of field effect
Sharpen the church itself to emphasize its detail
Smudge the sky and clouds into new forms.
Tuesday, November 25, 2008
Subscribe to:
Comments (Atom)


